Stakeholder Checklist

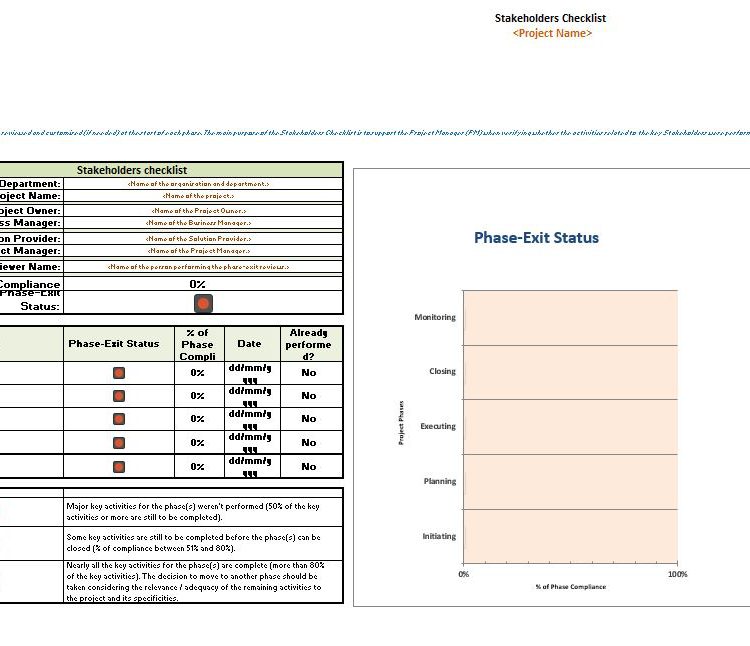
Resources based on the PM² Methodology Artefacts Stakeholders Checklist Artefact Stakeholders Checklist. Use this as a template for Stakeholders Checklist document. This template is part of the Monitor & Control…

Read More

Business Implementation Checklist

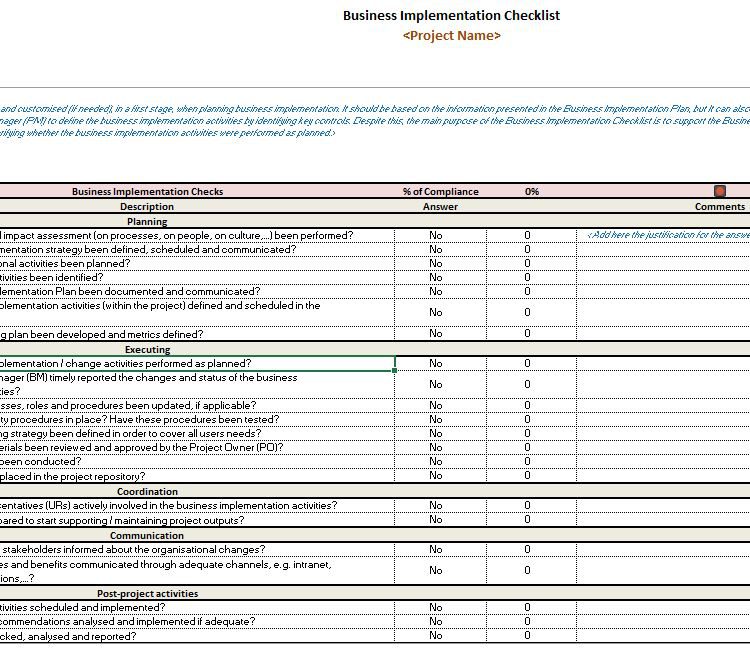
Resources based on the PM² Methodology Artefacts Business Implementation Checklist Artefact Business Implementation Checklist. Use this as a template for Business Implementation Checklist document. This template is part of the…

Read More

Transition Checklist

Resources based on the PM² Methodology Artefacts Transition Checklist for All Types of Projects Artefact Transition Checklist for All Types of Projects. Use this as a template for Transition Checklist…

Read More

Deliverables Acceptance Checklist

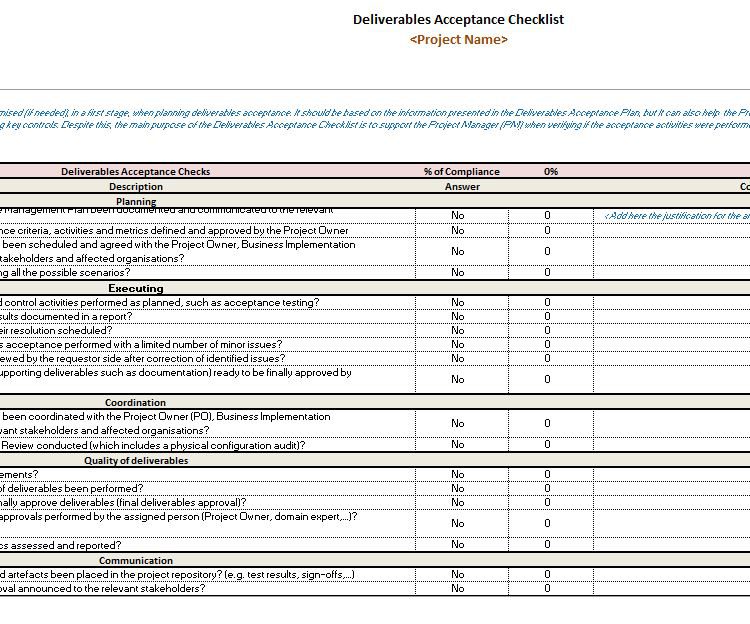
Resources based on the PM² Methodology Artefacts Deliverables Acceptance Checklist Artefact Deliverables Acceptance Checklist. Use this as a template for Deliverables Acceptance Checklist document. This template is part of the…

Read More

Quality Review Checklist

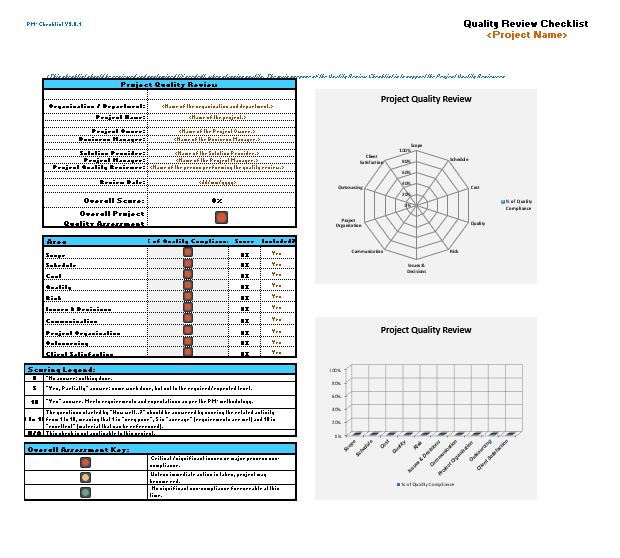
Resources based on the PM² Methodology Artefacts Quality Review Checklist Artefact Quality Review Checklist. Use this as a template for Quality Review Checklist document. This template is part of the…

Read More

Phase-exit Review Checklist

Resources based on the PM² Methodology Artefacts Phase-exit Review Checklist Artefact Phase-exit Review Checklist. Use this as a template for Phase-exit Review Checklist document. This template is part of the…

Read More

Change Log

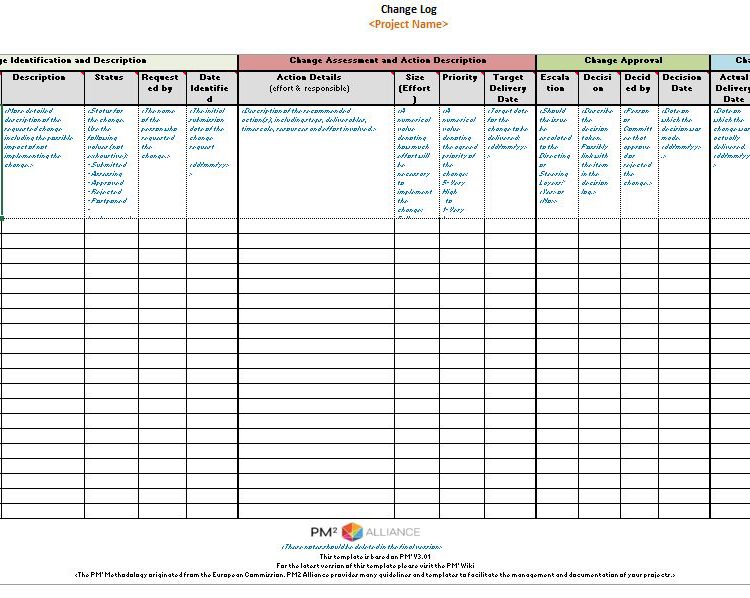
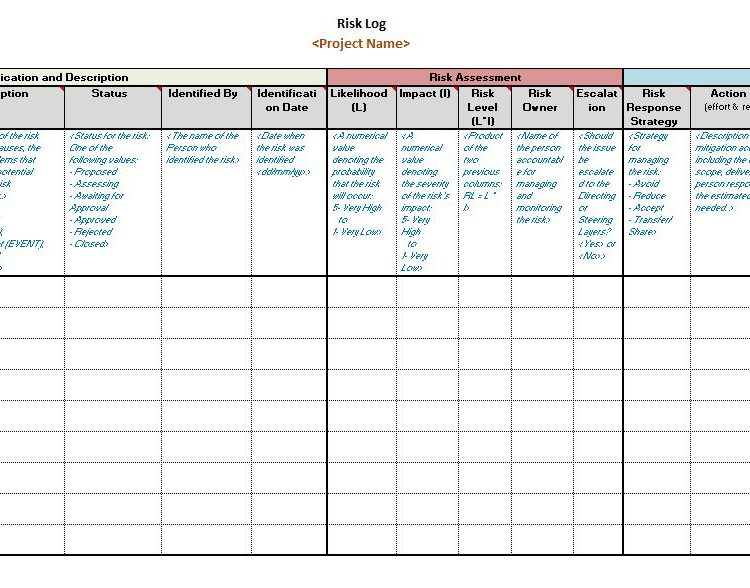
Resources based on the PM² Methodology Artefacts Change Log Artefact Change Log. Use this as a template for Change Log document. This template is part of the Monitor & Control…

Read More

Decision Log

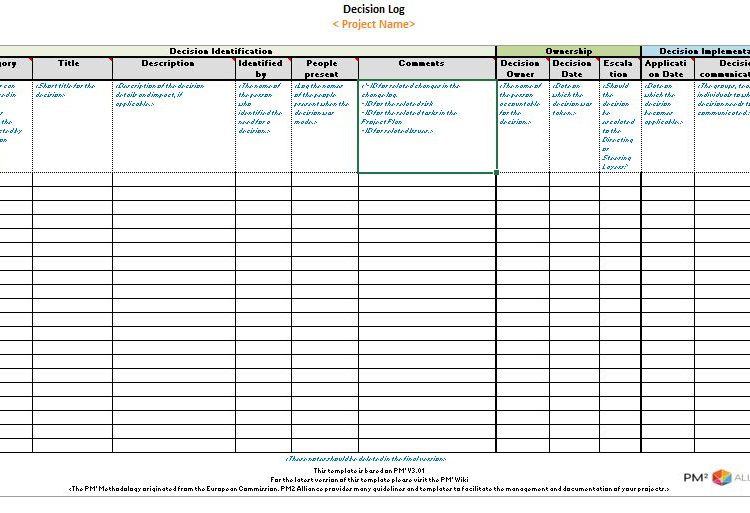
Resources based on the PM² Methodology Artefacts Decision Log Artefact Decision Log. Use this as a template for Decision Log document. This template is part of the Monitor & Control…

Read More

Issue Log

Resources based on the PM² Methodology Artefacts Issue Log Artefact Issue Log. Use this as a template for Issue Log document. This template is part of the Monitor & Control…

Read More

Risk Log

Resources based on the PM² Methodology Artefacts Risk Log Artefact Risk Log. Use this as a template for Risk Log document. This template is part of the Monitor & Control…

Read More

Write to us, we will come back to you by email

    Examination Process Q&A

    The particular guide provides information regarding the precise steps you need to take in order to connect to PM² Center website, navigate through it and participate in an exam.

    This guide applies only to the PM² Center website, which addresses to those who wish to participate in an exam and acquire a PM² Certification.

    • In order to create an account, you have to perform the following steps:

      NOTE: It is suggested to use Google Chrome browser, in order to be able to participate in the exam you want.

      • Click on Register for free
      • Fill in your personal information (Title*, First Name*, Surname*, Email address*, Password*, Confirm Password*, Phone, Country*, Organisation Name, Gender, Date of Birth*, VAT Number).

      IMPORTANT: It is required to fill in all the fields with an asterisk. It is not mandatory to fill in the Organisation Name and the VAT Number, but if you belong to an organization you need to fill in those fields, in order to invoice.

      • Click Submit.
    • You will receive an e-mail asking you to activate your account. Click on Clicking Here.
    • You will be redirected to PM² Center’s website.
    • After your account’s confirmation, you will receive an e-mail informing you that your account has been activated.
    • Open an Internet Browser and load PM² Center 
    • Fill in your Email and your Password.
    • Click Login.
    • Click on your name that appears at the top menu bar.
    • Click on Logout.
    • Click on your name that appears at the top menu.
    • Click on Profile.
    • Change the General Info (Title, First Name, Surname, Gender, Date of Birth, VAT Number), or the Contact Info (Email, Phone, Profile Image, Country, Organisation Name) that you want in the respective fields.
    • Click Save.
    • Click on your name that appears at the top menu.
    • Click on Profile.
    • Click on Change Password.
    • Fill in your Current and your New Password, then Confirm the New Password in the respective fields.
    • Click on UPDATE.
    • Click on Available Exams that appears on the left side menu.
    • All Available Exams will appear in the center of your screen.
    • Click on Exam History that appears on the left side menu.
    • Your Exam History will appear in the center of your screen.
    • Click on Payment History that appears on the left side menu.
    • Your Payment History will appear in the center of your web page.
    • Click on Support that appears on the left side menu.
    • Type your Subject and your Message in the respective fields.
    • Click on Send.
    • Click on Settings that appears on the left side menu.
    • Click on Profile if you want to make changes to your General or Contact Info.
    • Click on Password Management if you want to change your password.
    • Click on Payment History if you want to view the history of your payments.

    • Click on Available Exams that appears on the left side menu.
    • Click on Register Now on the particular exam that you want to complete.
    • If you have a Coupon Code (Voucher Code), fill it in the respective field and click on APPLY.
    • Click on PayPal.

    • If you want to pay with PayPal:

    1. Enter your email or mobile phone in the respective field.

    2. Click on Next.

    3. Fill in your credit or debit card details (Country/Region, Card number, Expiration date, CSC, First name, Last name) in the respective fields.

    4. Fill in your billing address and your contact information in the respective fields.

    5. Choose whether you would like to create a PayPal account or not and click on Pay Now.

    • If you want to pay with a Bank Account or Credit Card:

    1. Click on Pay with a Bank Account or Credit Card.

    2. Follow the same procedure described earlier regarding payment with PayPal.

    • Click on Available Exams that appears on the left side menu.
    • Click on Register Now on the particular exam that you want to complete.
    • Click on Claim your voucher here.
    • Fill in the requested information (Title, First Name, Last Name, Email, Country, Name of Organization, Position, Certificate, Your Message) in the respective fields.
    • Click on Request a Voucher.

    ! You can participate to the PM² Basic Certification Exam at any date and time. You can either take it as soon as you make the payment and/ or apply your voucher, or at any other time by clicking on Available Exams and then on Take Exam appearing below the PM² Basic Certification Exam. For the rest of the PM² Certification Exams you must reserve a slot in advance. Exam slots are being conducted on working days. You can find available Exam slots up to one month in advance.

    • Click on Available Exams that appears on the left side of your web page.
    • Click on Register Now on the particular exam that you want to complete.
    • Click on PayPal and follow the procedure described in the “How to make a payment” chapter, or apply your Voucher. If you are a member of the PM² Alliance and wish to claim a voucher, click on Claim your voucher here, fill in the requested information, and click on Request a Voucher. 
    • Select date and time for the exam, by choosing the slot that suits you from the list and clicking on SUBMIT.
    • IMPORTANT INSTRUCTIONS BEFORE THE EXAM:
    1. When starting your Exam, you will be asked to take and upload a clear picture of your face and a proof of identity (Accepted documents: National ID card, Passport, Driving license, Employer identification card in English, Academic ID). Therefore, you need to be in a well-lit place, have a camera, allow your browser access to your camera, and make sure you have the proof of identity available next to you.
    2. It is advised to use Google Chrome browser only.
    3. The exam should not be taken in the incognito/private mode.
    4. Make sure you start the Exam on time, this is an automated system and your Exam will be submitted by default at the end of your time slot.
    • IMPORTANT INSTRUCTIONS DURING THE EXAM:
      1. Please do not try to minimize or move out of the exam window screen. Your exam will be automatically submitted after a warning and you will not be able to retake it.
      2. Please do not press any shortcut keys (CTRL+C, CTRL+V, etc) or Windows key. Also you may not get out of the camera’s frame. Your exam will be automatically submitted after a warning and you will not be able to retake it.
      3. If during the examination your connection is interrupted for any reason, please contact us by email (support@pm2.center). We will review your case and, if applicable, we will provide you with a voucher in order to retake the exam.
      4. In case you have any other issue, you can send a message to your invigilator by clicking on Chat icon, which is located at the bottom right corner.

    In order to start your Exam, please perform the following steps:

    • Click on Available Exams that appears on the left side of your web page.
    • Click on Take Exam on the particular exam you want to complete.
    • Position yourself at the center of the frame and take a clear picture of your face by clicking on Capture. In case you are not satisfied with the picture, you can try again. Once you are ready press Next.
    • Place a valid Identification Card (Accepted documents: National ID card, Passport, Driving license, Employer identification card in English, Academic ID at the center of the frame and take a clear picture of it by clicking on Capture. If you are not satisfied with the picture, you can try again.
    • If you prefer, you can upload a picture of your Identification Card by clicking on Select file.
    • Click on Next once you are ready.
    • Read carefully the exam’s instructions and once you are ready click on I have read the Instructions.
    • You can change the size of the text by clicking on A+ if you want it bigger, or on A- if you want it smaller, which appear at the top right of your web page.
    • You can view your remaining time in order to complete the exam at the top right corner of your screen.
    • Answer the question and then click on Next. The question will be marked as Attended.

    NOTE: It is not mandatory to answer all the questions in turn. You can navigate from question to question and answer in any order you want.

    • You can view and answer any question you want by clicking on the corresponding number in the table located on the right side of your screen.
    • If you want to change an answer click on Clear.
    • If you find the content of a question to be incorrect, click on Flag in order to mark it as Tagged.
    • You can still answer the question that seems incorrect and it will be marked as Tagged & Attended.
    • Once you have completed the exam, click on Submit Exam.
    • Once you submit the exam, a warning will appear on your screen showing you the remaining time you have in order to complete it and asking you if you are sure that you want to proceed with submitting your exam. In case you want to return to the exam click on Cancel, while in case you want to continue with the exam’s submission click on Ok.
    • When you submit your exam, you will be asked to give your feedback. Write your comments in the corresponding box and click on Submit.
    • Click on Exam History that appears on the left side menu.
    • Click on the particular exam that you want to view.
    • If you read the word Pending, your exam is still under review.

    NOTE: The process of matching your identification details can take up to 2 working days.

    • If your exam has already been corrected, click on See Result so that you can view all the results in detail (Score, Total questions, Questions attended, Marks, Start time, End time, Correct, wrong and unattended questions).
    • NOTE: There are three kinds of possible results:
    1. Pass, when you have passed the exam.
    2. Fail, when you have failed the exam.
    3. Disqualified, when you have done an illegal action (e.g. minimize or move out of the exam window screen, press shortcut keys (CTRL+C, CTRL+V, etc) or Windows key).
    • There are three ways to view your certificate.
    • 1st Way:
    1. Click on Exam History that appears on the left side menu.
    2. Click on the particular exam of which you want to view the certificate.
    3. Click on View Certificate.
    4. You will be redirected to a web page in which you will be able to view your certificate.
    • 2nd Way:
    1. Click on Dashboard or on Available Exams.
    2. Click on View Result at the particular exam for which you wish to view the certificate.
    3. Click on View Certificate.
    4. You will be redirected to a web page in which you will be able to view your certificate.
    • 3rd Way:
    1. Click on Dashboard.
    2. Scroll down to the bottom of your screen.
    3. Click on View Certificate at the particular exam for which you wish to view the certificate.
    4. You will be redirected to a web page in which you will be able to view your certificate.

    NOTE: You have to log in your account in order to save and/or share your certificate. If you are not logged in, you can only view it.

    • View your certificate in one of the three ways described in the previous chapter.
    • If you want to save your certificate as pdf, click on PDF.
    • If you want to save your certificate as an image, click on Image.
    • View your certificate in one of the three ways described in How to view your Certificate.
    • Click on Share and the corresponding logo in order to share your certificate on social media platforms (Facebook and/or Twitter).
    • View your certificate in one of the three ways described in How to view your Certificate.
    • Click on Share and the corresponding logo in order to share your certificate on LinkedIn.
    • In case you are not signed in your account, you will be redirected to LinkedIn’s sign in web page. Fill in your account’s Email or Phone and Password and click on Sign in.
    • If you want to share your certificate in a post, you have to perform the following steps:
    1. Click on Share in a post.
    2. Write your comments in the corresponding field.
    3. Help your contacts see your post by adding the appropriate hashtags. Click on Add hashtag and type the hashtag you want.
    4. If you want to upload an imagevideo or text along with your post, click on the corresponding icon and attach the file you want.
    5. When your post is ready, click on Post.
    • If you want to share your certificate in a private message, you have to perform the following steps:
    1. Click on Send as private message.
    2. Type the name of the recipient you wish to send your certificate to, at the field Search for message recipients.
    3. Write the content of your message in the corresponding field.
    4. Click on Send.
    • Click on the Me icon that appears at the top of your LinkedIn homepage.
    • Click on View Profile.
    • If you have previously added a certificate, scroll down to the Licenses and Certifications section and click on Add.
    • If you have never added a certificate, you have to perform the following steps:
    1. Click on Add profile section in the right rail, in order to add a Licenses and Certifications section.
    2. Click on Background.
    3. Click on the Add icon next to Licenses and Certifications.
    • Fill in the name of your certificate, which can be found at the top of it.
    • Fill in the Issuing Organization (PM² Alliance).

    NOTE: Please be careful not to write PM2 instead of PM².

    • If your certificate does not expire click on the box next to This credential does not expire.
    • If your certificate expires, select the corresponding month and year, which can be found at the left of your certificate under the title Reevaluation date.
    • Select the corresponding month and year of your certificate’s issue date, which can be found at the left of your certificate.
    • Fill in your certificate’s Credential ID in the corresponding field, which can be found at the left of your certificate, under the title Certification number.
    • Copy and paste your certificate’s Credential URL, which is your certificate’s link. You can find it on the PM² Center website, by clicking on Exam History, the name of the corresponding certificate and the choice View Certificate.
    • Once you have completed the entire process, click on Save.

    An exam review can be requested when a candidate believes that a problem or an event has prevented them
    from successfully completing or succeeding a PM² Alliance Certification Exam. Should the request for review be
    directly related to one or more exam questions, the details of the problem must be clearly explained, and the
    necessary information provided (i.e. e-Voucher or Test number, question number and/or a description of the
    question). This will allow for the PM² Alliance Certification Reviews & Appeals Committee (CRAC) to identify the
    question and review the claim.
    An appeal can only be made on ground of the following:
    • exam platform irregularity during the exam
    • specific question irregularity
    • unfair dismissal or exam suspension
    In both cases, the request should be submitted formally to the attention of the PM² Alliance Certification
    Reviews & Appeals Committee (CRAC) within 5 working days of the exam’s date/incident. The PM² Alliance
    will acknowledge the receipt of the request for review or appeal automatically, will conduct all necessary
    validation in a constructive, impartial and timely manner, and will provide an answer within 10 working days.
    The outcome decision of the Committee will be final. A record of the complaint, including any subsequent
    action(s) taken, and the decision made will be maintained by the PM² Center. All information pertaining to the
    complaint will remain confidential.
    Should the PM² Alliance Certification Reviews & Appeals Committee (CRAC) acknowledge a mistake in a
    question, the procedure will be to remove the question from the exam and the candidate’s final score will be
    recalculated based on the remaining number of valid questions. The PM² Center Certification Reviews &
    Appeals Committee (CRAC) is comprised of the following three members:
    1. PM² Alliance Certifications Coordinator
    2. PM² Center Expert 1 and Expert 2
    Please also note the following:
    ▪ Candidates accept the rules of the examination once they start an exam, therefore, appeals against
    the exam rules as published on the exam invitations and communicated at the beginning of the exam
    session, will result a negative outcome.
    ▪ In order to safeguard the credibility of the exam and its fairness to future candidates, the wording of
    the questions and their answers will not be communicated.
    ▪ Please visit and review the sections Problem and Complaint Handling at the following page:
    www.PM2.center/Certification/appeals
    ▪ For further information, please contact support@pm2.center with the subject of Certification Review
    & Appeals.